


The Best Way to Clean Leather Tack
Sep 19th 2023

Your saddle and bridle can be two of the most expensive pieces of horse equipment you own, so it is vital that you look after them correctly. In this blog, we will discuss the best way to clean your leather tack with a step-by-step guide.
Admittedly, tack cleaning is not the most fun job, but it is vital for safety and durability. Water, mud, heat, sweat, and neglect are its greatest enemies - when in use, the heat from the horse draws out a certain amount of oil and fat, and the tack replaces these. If your leatherwork gets rained on whilst you are riding, this can cause the leather to become stiff and brittle.
To start, you need to have the correct items. Your tack-cleaning equipment should include a:
- Saddle horse
- Tack cleaning hook
- Towel
- Tea towel
- A bucket of warm water
- 2 x Sponges (one for washing and one for soaping)
- Soft cloth
- Tack cleaner and conditioner
How To Clean a Bridle
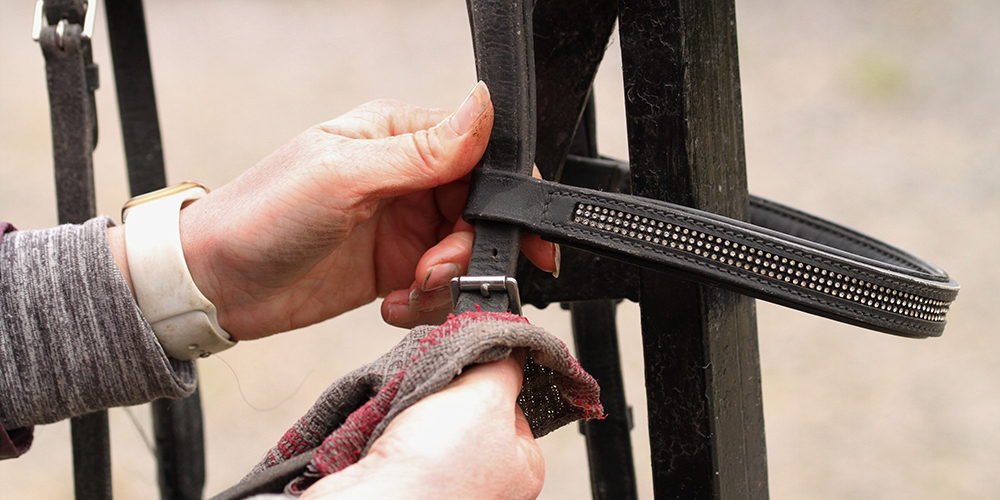
There are two different methods you can use to clean your bridle. You can keep the bridle together while cleaning or 'strip' clean it (take it entirely apart). If you haven't cleaned your bridle in a while, it is a good idea to strip clean it first, and then you can keep on top of its maintenance with a quick clean. Let's walk through how to strip clean your bridle.
Step One: Disassemble the Bridle
A traditional English bridle, when complete, is made up of 7 essential parts:
- Headpiece and throatlatch
- Browband
- Two cheek pieces
- Noseband
- Bit
- Reins
First, remove the bit and pop it into a bucket of warm water. If you have a curb chain, this can go in the water. However, if you have a leather lip strap, make sure to remove the lip strap first.
If you are cleaning in a tack room, hang your bridle on a bridle-cleaning hook. Lay a towel down if you don't have one or are at home. Start taking the bridle apart, memorising where the buckles were, what hole they were on and where pieces go.
Step Two: Cleaning & Conditioning
Now you can start the cleaning process. Begin by removing any mud or dirt with a soft brush. Follow this by using warm water and a sponge to wipe over the pieces. The water helps to remove any build-up of grease. Ensure the sponge is only damp and squeezed out, as too much water can cause the leather to stretch. Keep regularly rinsing the sponge in the water. Alternatively, you can use a tack cleaner spray like the Carr & Day & Martin Tack Cleaner . Its formula effectively cleans the leather, removing dirt, grease and sweat with ease.
With a tea towel, rub over the pieces to dry them off, set them aside, and allow any cleaner to soak in while you do the bit. By now, the dirt on the bit should be soft, so you can wipe this off and dry it with the tea towel.
Now it's time to condition the leather. Conditioners will keep your tack supple, feeding the leather and leaving it nourished and shiny. You can use a traditional glycerine saddle soap bar or a contemporary leather conditioner, such as the NAF Sheer Luxe Leather Balsam .*
Apply a bit to the sponge or cloth, wrap around the leather piece and pull it through the sponge/cloth. You can also use a side-to-side rubbing motion to help work the product into the leather. Pay particular attention to the folds and bends, as this can be easily missed during a quick clean. Make sure you rub everything well in and be thorough on the rough side, as this is where most of the product will be absorbed.
TOP TIPS!
A handy tip is to use a cocktail stick to poke out dirt and product deposits from holes in the bridle pieces — but be careful not to enlarge the hole. A soft toothbrush is also helpful for brushing away trapped dirt. You can use your soft cloth to polish all the metal.
Use neatsfoot oil first if the bridle has got very wet or dried out. The formula will replace the oil and fat which has been lost and help with any stiffening or cracking. Leave this to soak and dry, then follow the clean and conditioning steps.
STEP THREE: Reassembly
Once all products have soaked in and the tack has dried naturally, it is time to put everything back together. The easiest way to do this is to have something to hang it on either your tack-cleaning hook, door handle or a super helpful spare hand!
- Start by threading the short side of the headpiece through the off side of the browband, then the near side, making sure the throatlatch is to the rear.
- Place the headpiece on the hook, handle or hand.
- Next, thread the noseband through the browband the same way as the headpiece. It should be on the underside of the headpiece. Buckle to the near side if there is a single buckle.
- Attach two cheek pieces.
- Attach the bit to the cheek pieces. Ensure the bit is not upside down and its curve follows the same as the curve on the nose and browbands.
- Place all straps in their keepers and runners.
- Attach reins to the bit under the cheek pieces going towards the rear of the bridle.
REMEMBER: When putting a bridle back together, buckle fastenings should be on the outside and billeted fastenings should be on the inside.
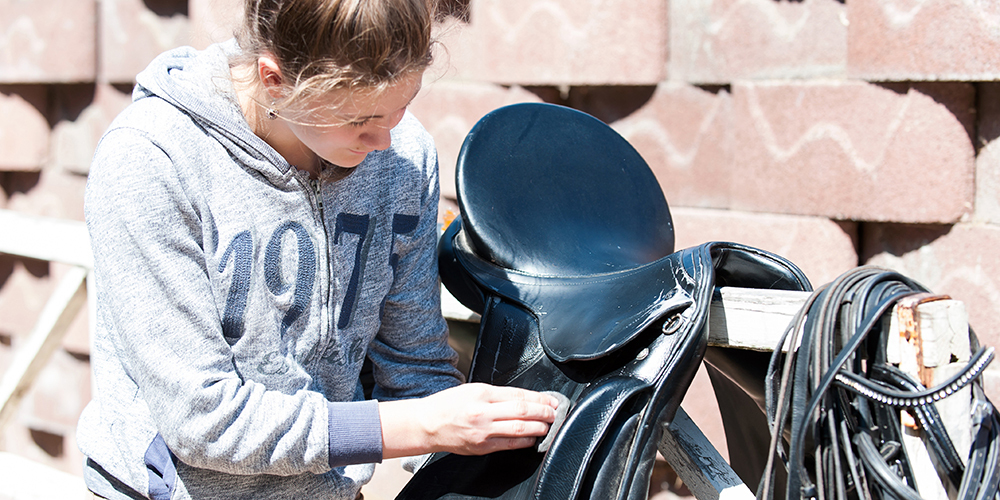
How To Clean a Saddle
Cleaning a saddle is much the same as for a bridle.
STEP ONE: Disassemble the Saddle
To start, place the saddle on a saddle horse. If you do not have one, carefully place the saddle on a towel and then use another towel rolled up and place this under the pommel. Be careful not to drop or let the saddle fall, as this can damage the tree.
Strip the saddle and remove the girth, stirrup leathers and irons, including the treads. Place the stirrup irons in another bucket of warm water and leave to soak. Stirrup irons and stirrup treads can get extremely dirty with sand and mud, so it's best to soak these separately.
STEP TWO: Cleaning & Conditioning
Now, you are ready to start cleaning. The most important thing is not to use too much water on your saddle. Up-end your saddle carefully and wipe the underside using warm, clean water. Make sure the sponge is well squeezed out! Use light circular motions and rinse your sponge or cloth regularly. After you have done the underneath, repeat with the top.
After wiping the saddle over, you can apply saddle soap. Not much is needed, especially on the seat – you don't want to slip out of your saddle! Pay attention primarily to where the girth straps and saddle flaps are, as these areas require the most conditioning.
Lastly, give your girth and stirrup leathers a good wipe, removing any grease and mud, then give it a good application of leather conditioner. Scrub your irons and treads with a stiff brush and dry with a tea towel.
Now, reattach your stirrups and gently lay your girth over the top – ideally over a saddle cover. Next, place your saddle and bridle on their racks and stand back to admire all your hard work.
Tack Cleaning Tips
- NEVER dry your tack in front of a fire or radiator. If it has got too wet, leave it somewhere dry and well-ventilated.
- If your tack gets covered in wet mud whilst out riding, the best thing to do is to get the worst off as soon as you have untacked.
- Try to keep on top of cleaning your tack by giving it a quick wipe after you ride. At the minimum, you should ensure you wash the bit off.
- Give your tack a thorough clean once a month, as this will keep it in good condition and allow you to check the stitching and spot any damage.
- Store tack in a bridle and saddle bag, and use a saddle or stirrup cover on your irons. All of these will help keep the saddle protected.
By following these steps, cleaning your tack will be a breeze, and if you regularly keep on top of this, the job will be even easier the next time. As a reminder, it is really important to clean your tack - not only does it help keep your tack looking great, but it also keeps you safe in the saddle as it allows you to thoroughly check it upon cleaning.
If you are looking for any new tack, we have a whole range you can check out.
*NB when using a new tack cleaner or conditioner for the first time make sure you test on an inconspicuous area first. Remember that different types of leather may require slightly different cleaning approaches, so always refer to the manufacturer's recommendations or seek advice from knowledgeable equestrians if you're unsure.